

View Conversations
-
Go to Analytics > Overview > Conversations.
-
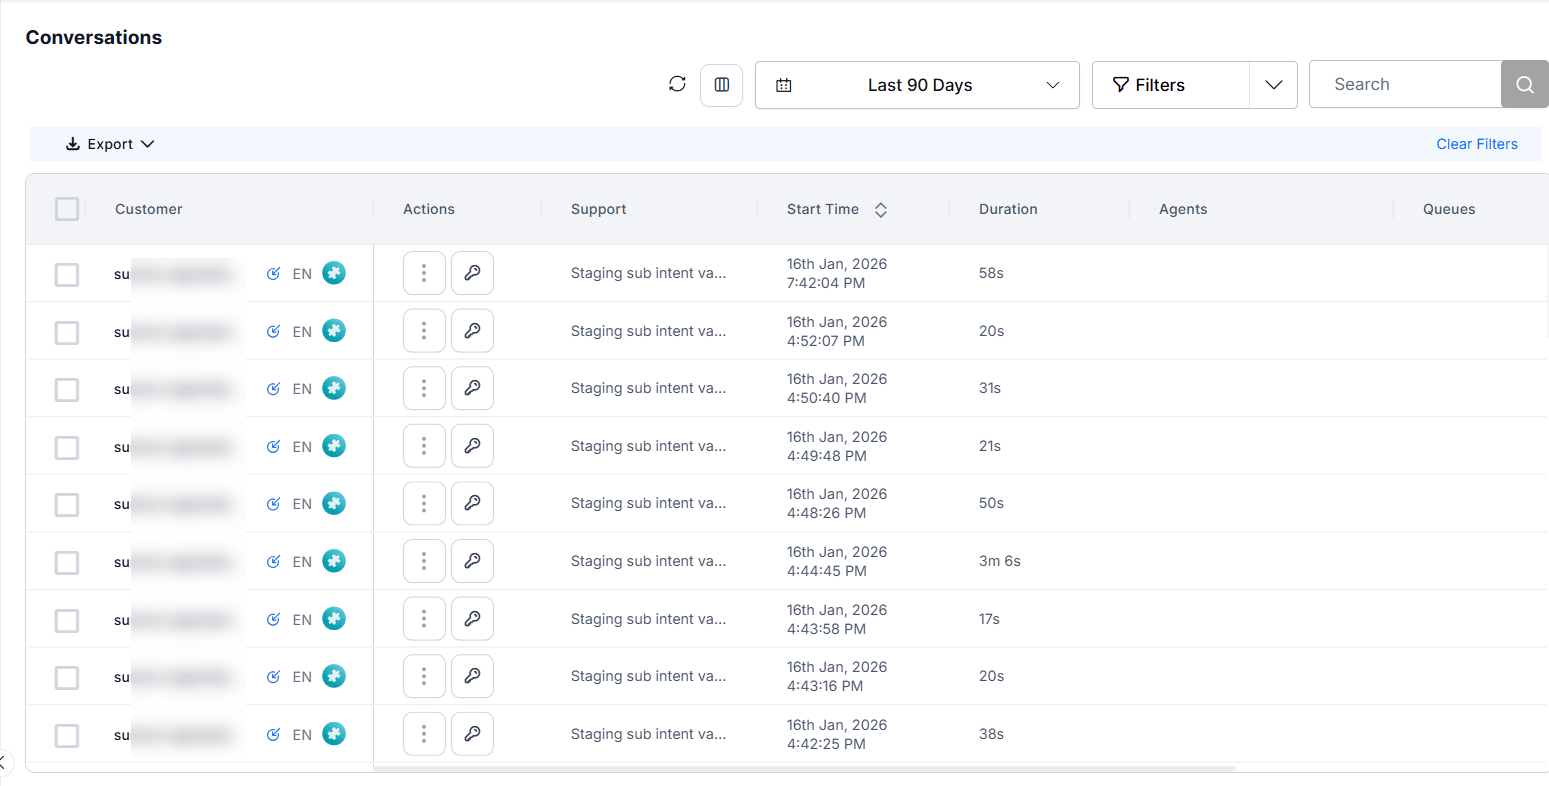
The following details appear in a table:
-
CUSTOMER: The contact who initiated the conversation.
- Direction (icon): Inbound or Outbound.
- Language (icon): Language of the conversation.
- Channel (icon): Voice, Chat, or Email.
-
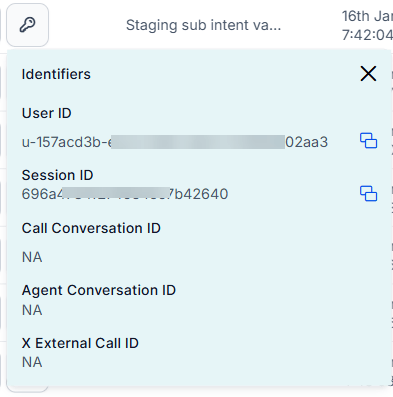
ACTIONS: Download recordings and transcripts, and copy the following identifiers:
- User ID
- Session ID
- Call Conversation ID
- Agent Conversation ID
- X External Call ID
- Support: The agent who handled the conversation.
- Start Time: Date and time the conversation was logged. Select the arrow icon to sort newest to oldest or oldest to newest.
- Duration: Duration of the inbound conversation.
- Agents: Profile pictures of agents who participated, in the order they joined. Hover to see agent names.
- Queues: The last queue name, with +N for additional queues. Hover to see the order in which queues were entered.
- Skills: One skill shown with +N for more. Hover to see all skills associated with the conversation.
-
Status: Conversation statuses include:
- In Progress: An ongoing conversation, displayed immediately in the Conversations tab.
- Error: A disruption to an ongoing conversation resulting in an error message, typically from integrated system failures.
- Completed (Drop Off): A voice call where there was no user response and the conversation ended.
- Completed (User Hangup): A voice call where the user ended the conversation.
- Completed (AI Agents Hangup): A voice call where the AI Agent completed the task and ended the call.
- Completed: A chat conversation where the AI Agent completed the task and ended the session.
- CSAT: Displays the CSAT survey score. A gray icon means the survey was triggered but no response was submitted.
- NPS: Displays the NPS score. A gray icon means the survey was triggered but no response was submitted.
- Like/Dislike: Displays the Like or Dislike selection. A highlighted icon means the user submitted a response. A gray icon means no response was submitted.
-
CUSTOMER: The contact who initiated the conversation.
Supervisor Actions
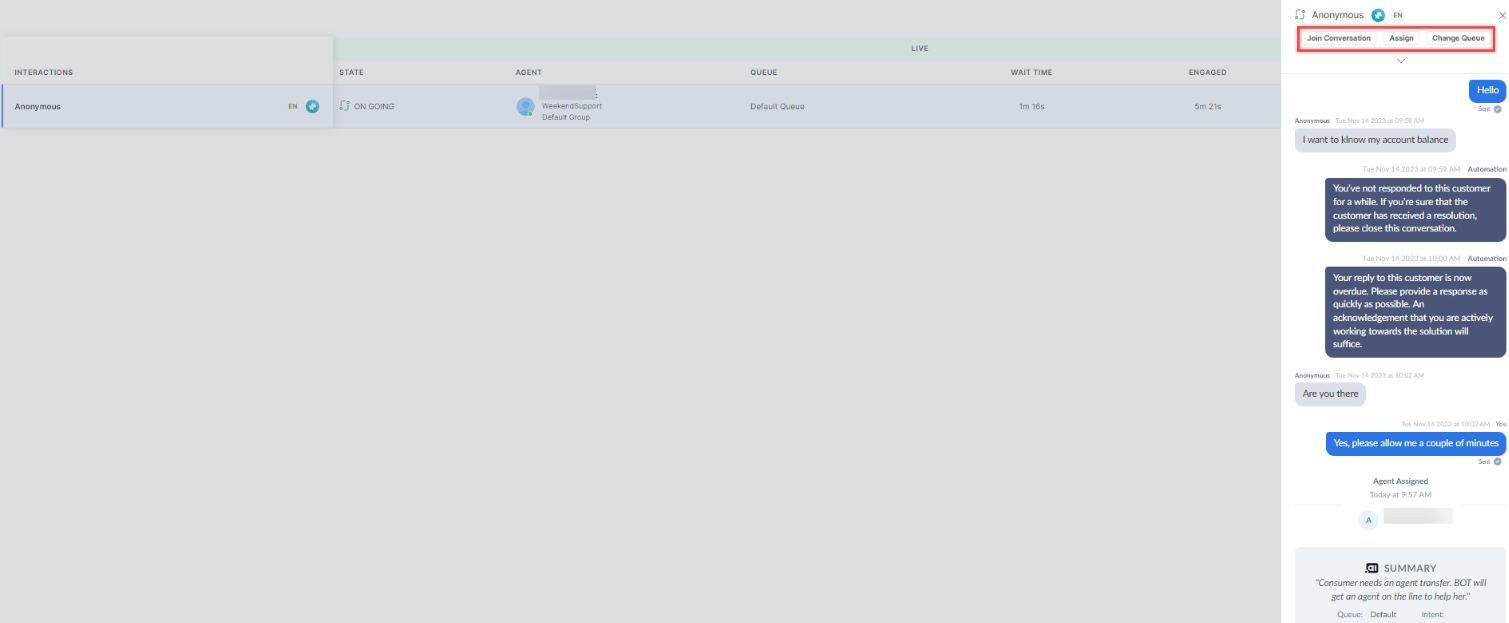
Supervisors can view ongoing conversations and intervene directly from the Conversations tab, similar to the Monitor tab.- Select Conversations under the Overview section of the Analytics panel.
-
Select ⋮ under ACTIONS, then select Supervisor View.

-
You are redirected to the Conversations section on the Monitor tab.

-
Select an ongoing conversation. You can perform the following actions:
- Join Conversation
- Assign
- Change Queue
Search Conversations
Use the search field on the upper right side of the Conversations tab to find specific conversations. The system supports keyword search across chats, call transcripts, agent notes, and disposition notes. Common words are ignored and results are ranked by relevance by default. You can sort by Start Time when needed.Recent Searches
The system stores up to the last ten search phrases for the current user and displays them in the dropdown. You can select a previous phrase or enter a new one. After each search, the system saves the phrase as the most recent entry, removing duplicates and updating position.Export and Download
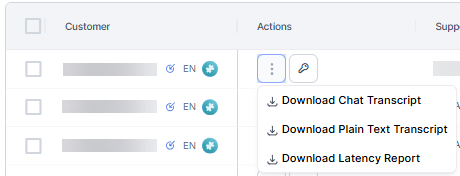
You can download recordings, transcripts, latency reports, and events from the dashboard.Prerequisite
- To enable Download Latency Report, add the following Call Control Parameters:
notifySttLatency = true, vadEnable = true, vadVendor = silero.
Export Conversation Data and Transcripts
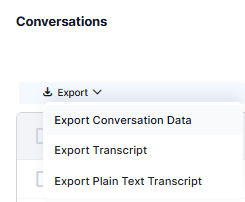
- Select the conversations and select Export.
-
Select Export Conversation Data, Export Transcripts, or Export Plain Text Transcript.
- Export Transcripts exports transcript files as a compressed file named
transcripts-YYYY-MM-DD-HH24-mm-SS.zip. - You can select up to 25 conversations for export as transcripts. Conversations without a transcript include a blank transcript in the export.
- When permissions aren’t granted or are disabled, download options are inactive, and an access restriction message appears on hover.
- Export Transcripts exports transcript files as a compressed file named
- A status message appears at the start of the export. The file downloads on completion.
Preview and Download Events
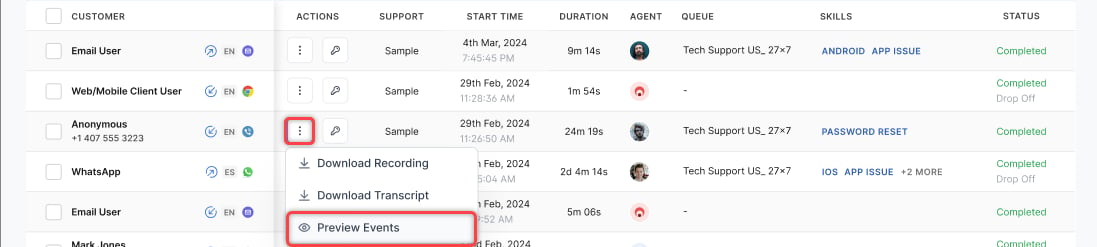
- Select the conversations, select Export, or select the ⋮ icon under Actions.
-
Select Preview Events.
-
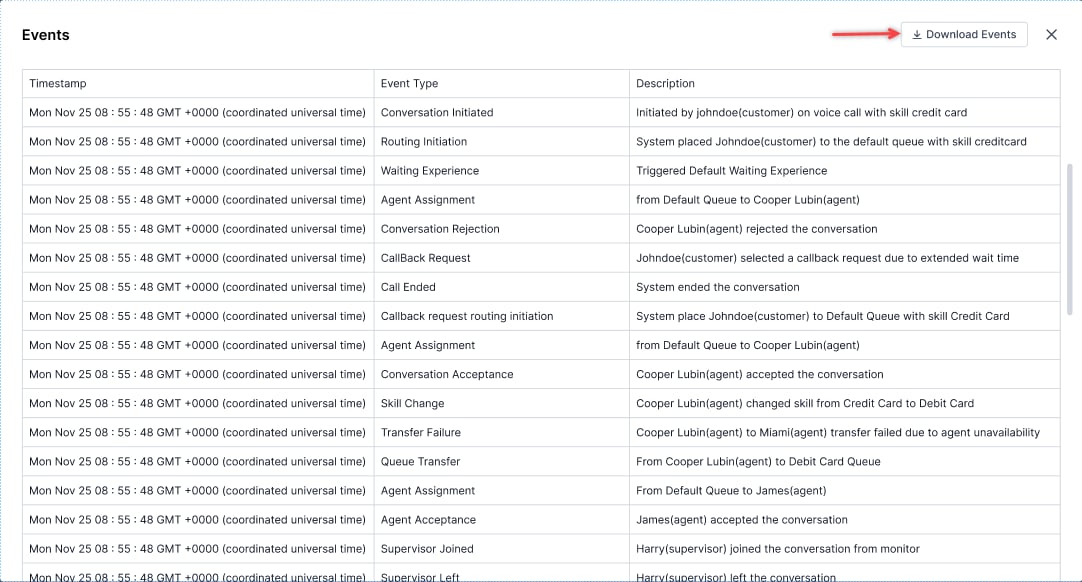
Select Download Events.
- The Download Events option is unavailable for conversations older than 30 days.
- Events are recorded periodically, so the exported document may not always reflect the complete event history. For a comprehensive record, download events after the conversation has ended.
-
A confirmation appears when the export completes. The system exports the following events and their timestamps for chat and voice conversations:
- Routing Initiation
- Conversation Acceptance
- Conversation Rejection
- Conversation Transfer
- Transfer Failures
- Agent Join
- Agent Left
- Agent Consultation
- Skill Change
- Disposition Updates
- After-Call Work (ACW)
- Conversation Closure
Latency Metrics (Beta)
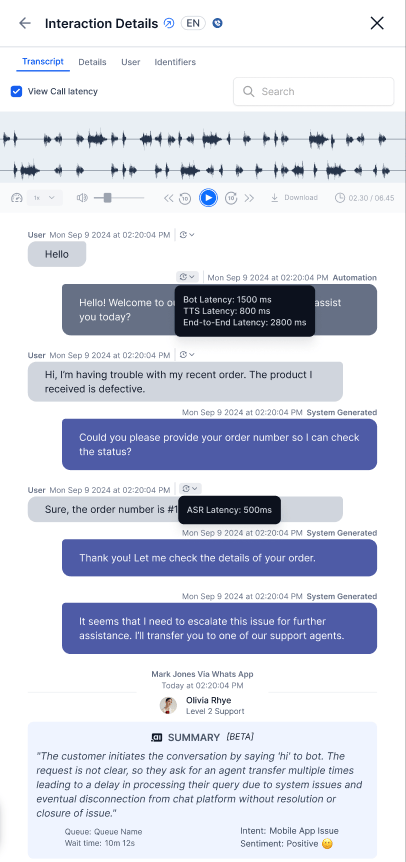
The Latency Metrics feature measures the duration of each stage in a voice interaction: ASR, bot processing, TTS, and end-to-end response time.-
ASR Latency: Time between when the user stops speaking and when the ASR provider returns the full transcription.
Formula:
ASR Latency = User stops speaking → ASR returns full transcriptExample: User stops speaking at10:00:05.000; ASR returns transcript at10:00:05.450→ ASR Latency = 450 ms -
Bot Latency: Time between when the Voice Gateway (VG) sends the transcription to the platform and when VG receives the full response.
Formula:
Bot Latency = VG sends transcript → VG receives bot responseExample: Transcript sent at10:00:05.450; bot response received at10:00:06.300→ Bot Latency = 850 ms -
TTS Latency: Time between when VG sends the bot’s response text to the TTS provider and when VG receives the first byte of synthesized audio (Time to First Byte). Total TTS audio-generation time isn’t shown.
Formula:
TTS Latency = VG sends TTS request → VG receives first audio byteExample: TTS request sent at10:00:06.300; first audio byte received at10:00:06.700→ TTS Latency = 400 ms -
End-to-End Latency: Total time between when the user stops speaking and when the first audio byte plays back to the user.
Formula:
End-to-End Latency = User stops speaking → First audio byte heardExample: User stops speaking at10:00:05.000; first audio byte heard at10:00:06.700→ End-to-End Latency = 1.7 seconds
Edit Dispositions from the Conversations Tab
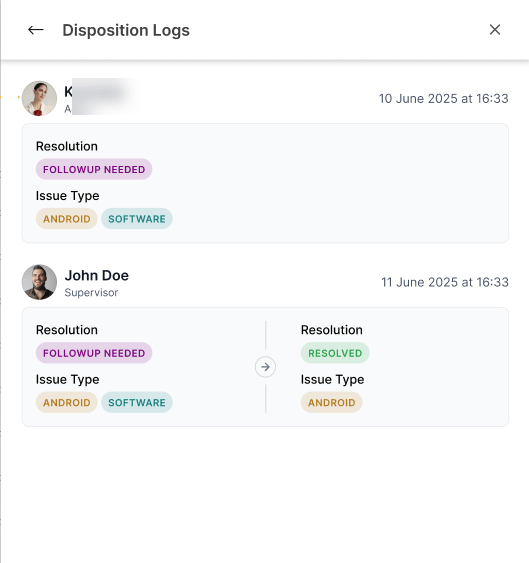
Supervisors can edit or override disposition codes after a conversation ends. Agents assign dispositions during live sessions, but supervisors can review and revise them from the Conversations tab once the session is complete. Key highlights:- Improved auditing and compliance
- Accurate reporting and resolution tracking
- Reduced dependency on agents for post-call updates
- Agents receive a notification when a supervisor updates a disposition
- Select a completed interaction to revise.
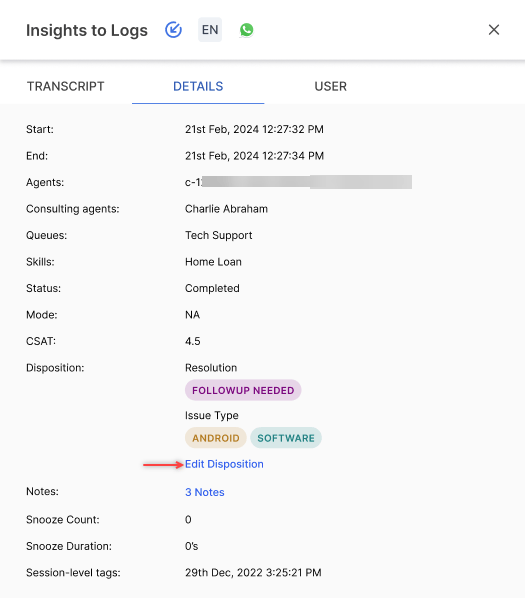
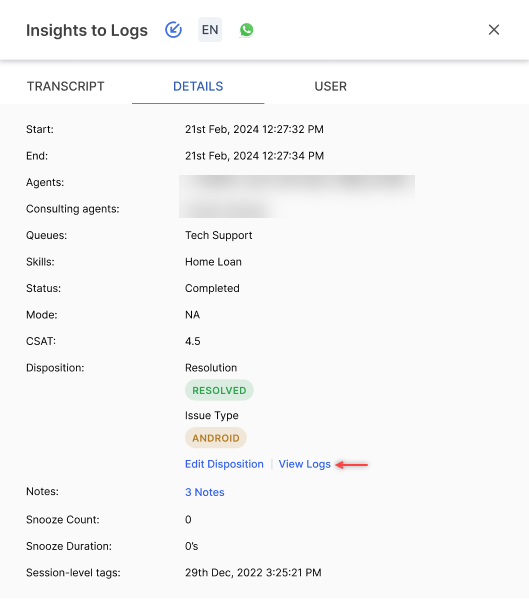
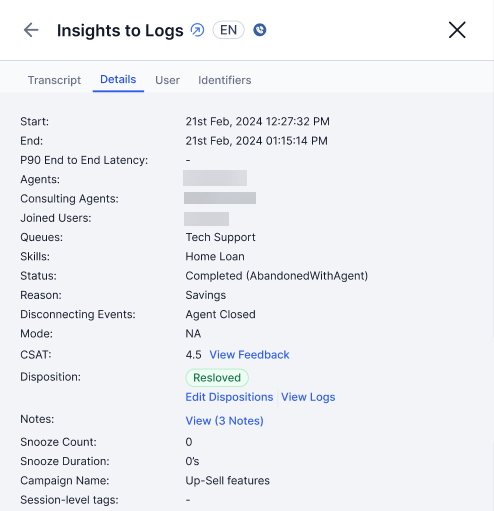
- Select the DETAILS tab in the Insights to Logs window.
-
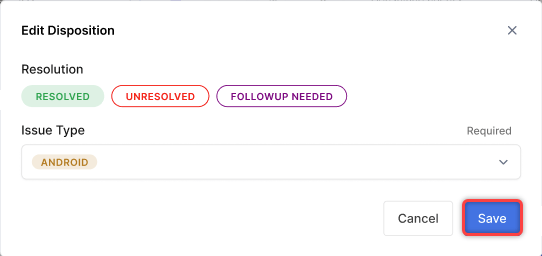
Select Edit Disposition.
-
Make the necessary changes and select Save.
-
Select View Logs.
Filters
You can create and save multiple filters on the Conversations tab to avoid re-entering your filter selections repeatedly.Create Filter
- Select the Filter icon.
- Select New Filter.
- Select the Filter By criteria.
- Select Save & Apply.
- In the pop-up, enter a name for the filter and select Save & Apply.
SmartStatus
SmartStatus is a fine-grained, business-relevant version of conversation status. It detects events such as call handling, messaging activity, inactivity, or disconnections and updates the conversation status accordingly.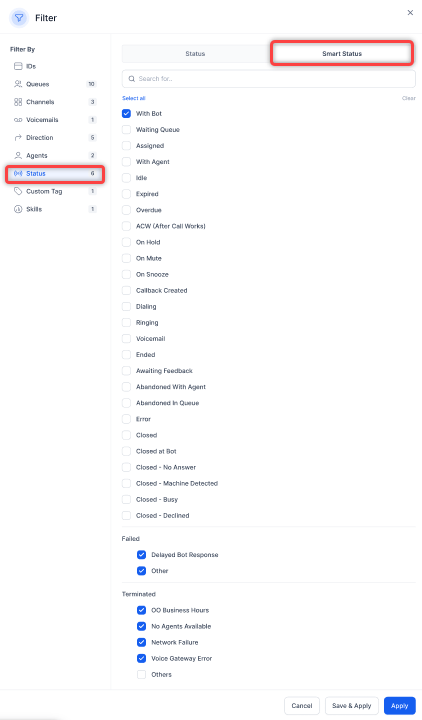
Filter for Custom Tags
You can filter conversations using custom tags.-
Select the Filter for Custom Tags (Beta) checkbox. The following fields appear:
- Tag name
- Predicate dropdown (CONTAINS and DOES NOT CONTAIN)
- AND to create a new clause

- Select values for the custom tag fields and select AND to add another clause.
-
Select values for the second clause and select Apply.
 You can add up to 5 clauses.
Edit Filter
- Select the Filters tab. The saved filter name appears.
- Select Edit.
- Make the necessary changes and select Save & Apply.
Copy Filter
- Select Duplicate.
- In the Rename Filter window, enter a name and select Save.
Mark as Default
- Select Mark as Default. A confirmation message appears and the filter is set as default.
Delete Filter
- Select Delete.
- Select Delete on the confirmation message.
Insights to Logs
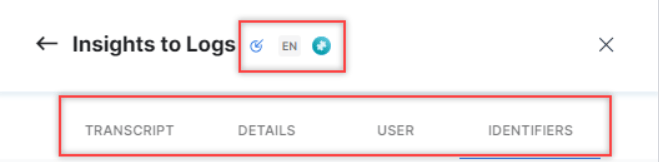
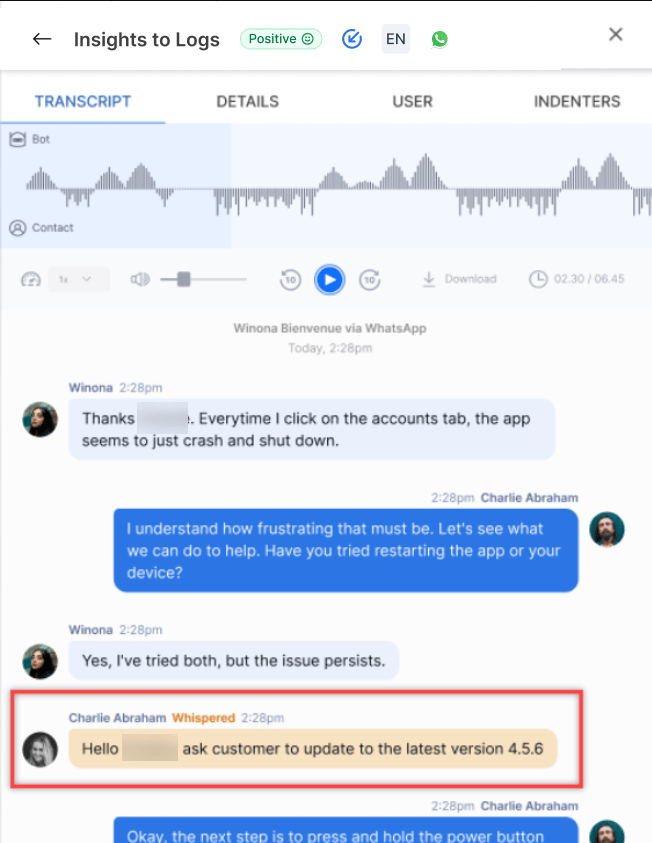
The Insights to Logs panel shows conversation details between the contact and the agent. Select an interaction to view the panel. The following tabs appear:- Transcript (formerly Chat History)
- Details
- User
- Identifiers
- Direction (inbound or outbound)
- Language
- Sentiment (Positive, Neutral, etc.)
- Channel (Voice, Chat, or Email)
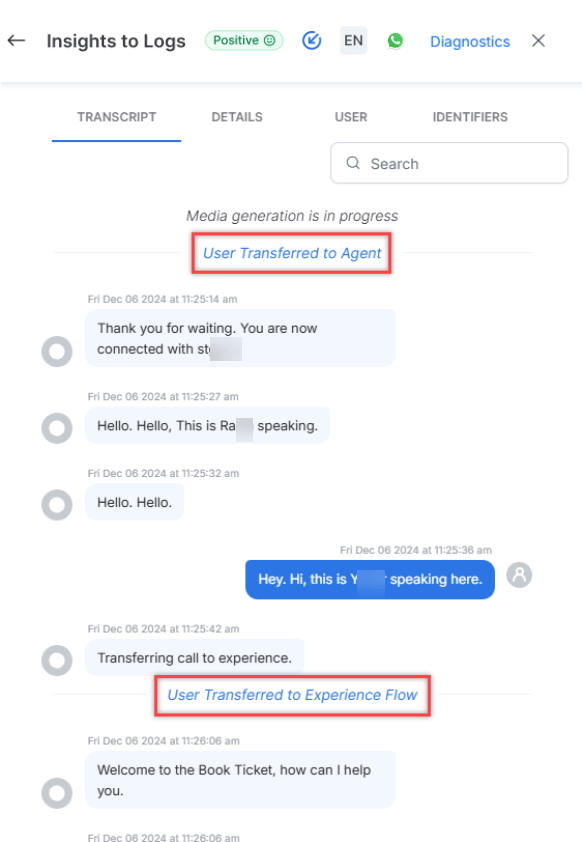
- User transferred to Agent: When Automation transfers the voice call to an agent.
-
User transferred to Automation: When the agent transfers the voice call back to Automation.
-
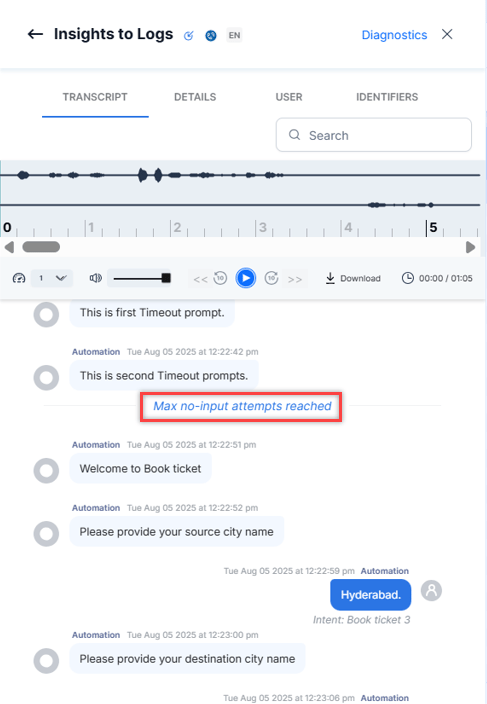
Max no-input attempts reached: When automation triggers the AI Agent behavior for exceeding maximum retries.
- Customer speech during hold periods isn’t recorded or displayed in transcripts, regardless of who initiated the hold.
- To redact PII in the transcript, select De-identify PII data while presenting it to the user from the entity node.
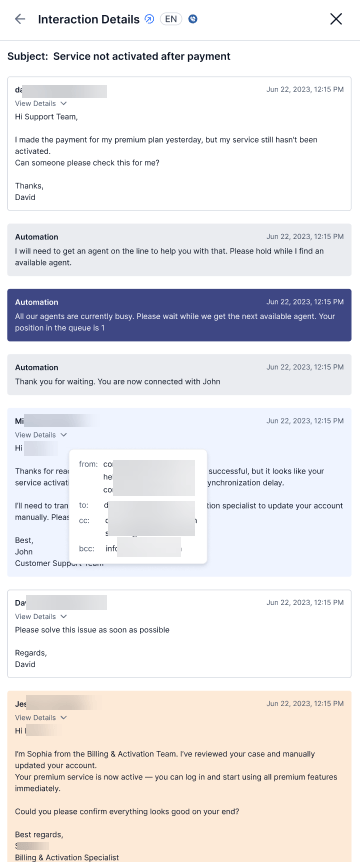
- Subject at the beginning of the transcript.
- Each email entry with a View Details pop-up.
-
The pop-up shows From, To, CC, and BCC fields.
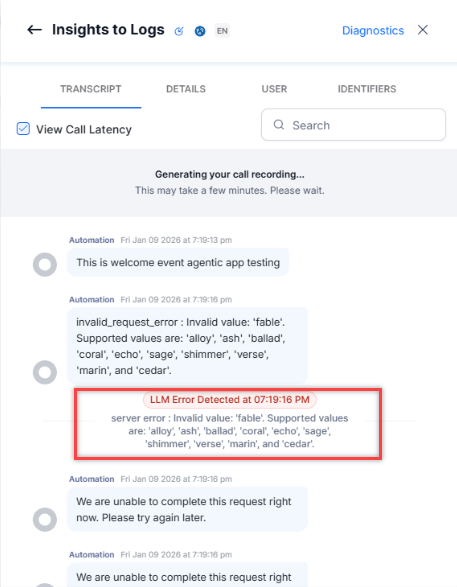
<Agent Name>: Timestamp and error type: SIP drop, WebRTC ICE failure, Agent heartbeat timeout, or Unknown.
LLM Error Detected: An error message appears when real-time voice APIs in Agentic apps disconnect after receiving an error.
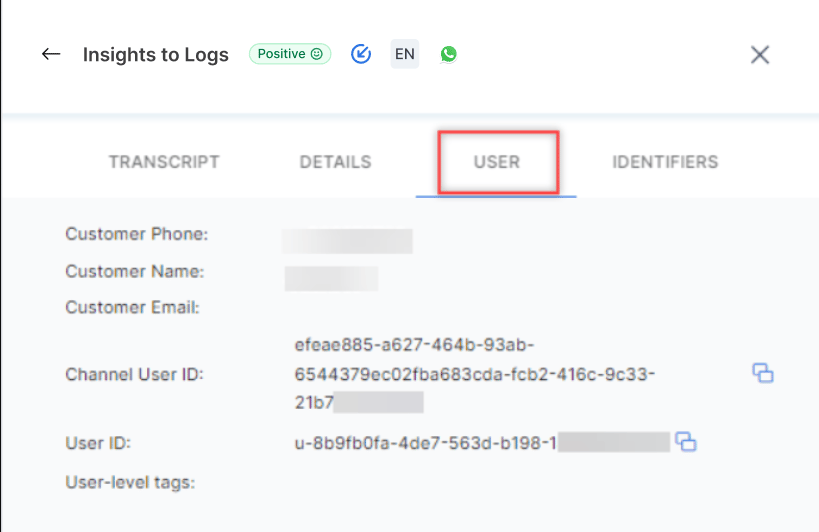
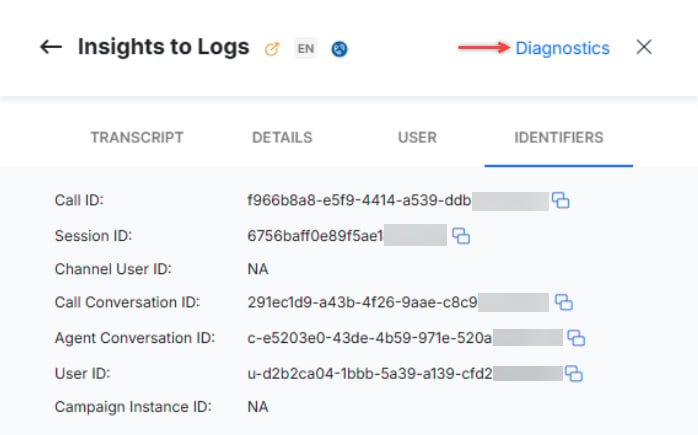
Select Copy All to copy all identifier details including Start Time, End Time, Caller ID, Session ID, Channel User ID, Call Conversation ID, Agent Conversation ID, User ID, Caller, and Callee.
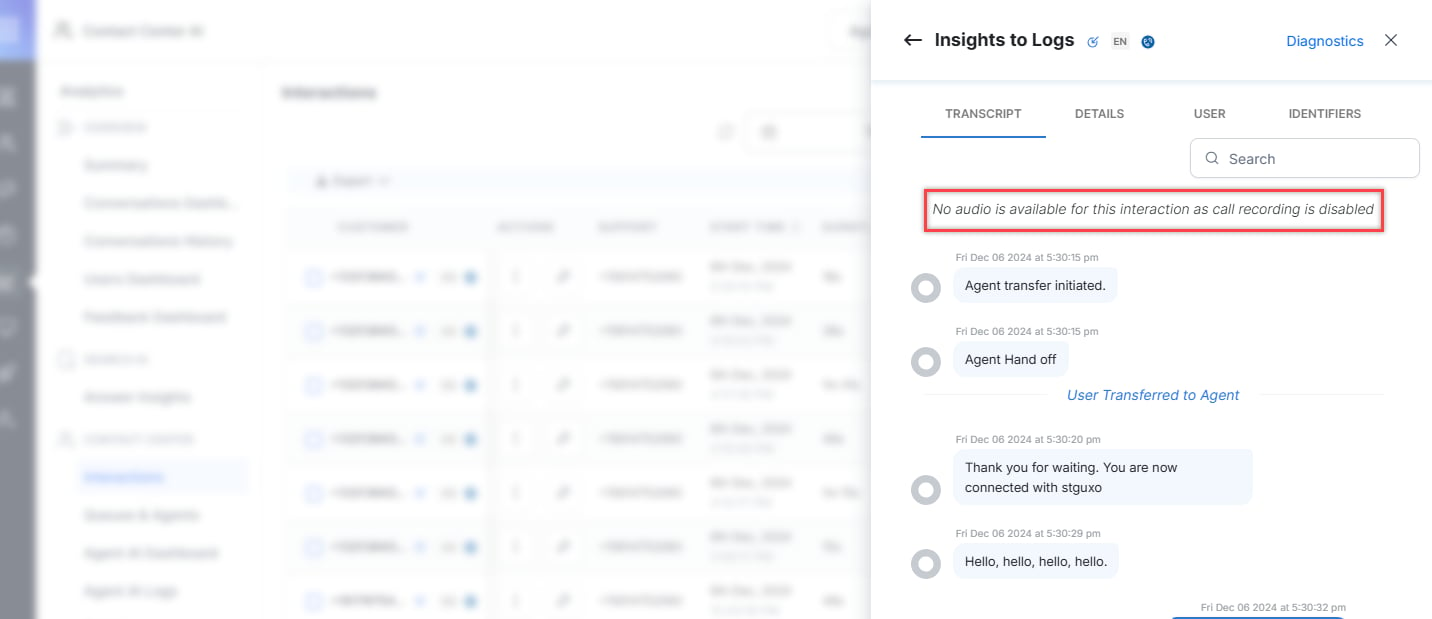
Call Recording
The Call Recording feature plays past conversations between a contact and an agent from the Chat History section in the Insights to Logs panel. Recordings are captured automatically and are useful for quality analysis and auditing. Configure the following settings:- Play Audio: Select the Play icon to play the audio waveform.
-
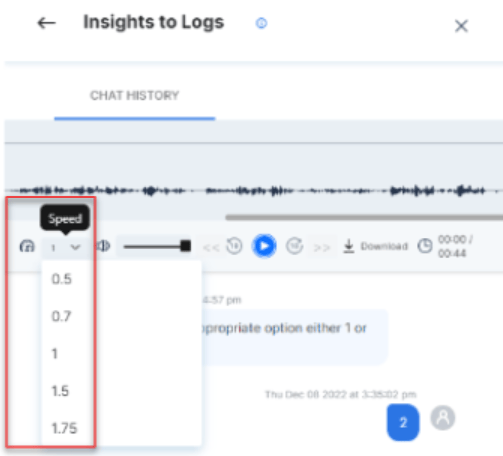
Playback Speed: Select the speed drop-down to change playback speed.
- Volume: Adjust the slider to increase or decrease volume.
- Mute: Select Mute to silence the audio.
- Rewind: Select the Backward icon to rewind 10 seconds.
- Forward: Select the Forward icon to fast-forward 10 seconds.
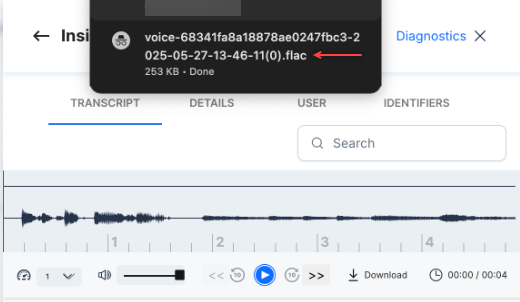
- Download: Select the Download icon to download the recording as a single file or separate files.
- A delay may occur before call recordings are processed and displayed for an interaction.
- The retention period for voice call recordings can be configured in Data Retention Period settings.
- When the configured retention period ends, recordings are permanently deleted.
- Customers who opt in receive an email 7 days before deletion and a confirmation email after deletion.
- After deletion, users see: “Recording not available. It may have been deleted as per your data retention policy.”
- All actions, including retention configuration and recording deletions, are logged in the Admin Console.
- Download as a single file: Downloads all files in the conversation as a single file.
- Download as separate files: Lets you select individual files to download.
-
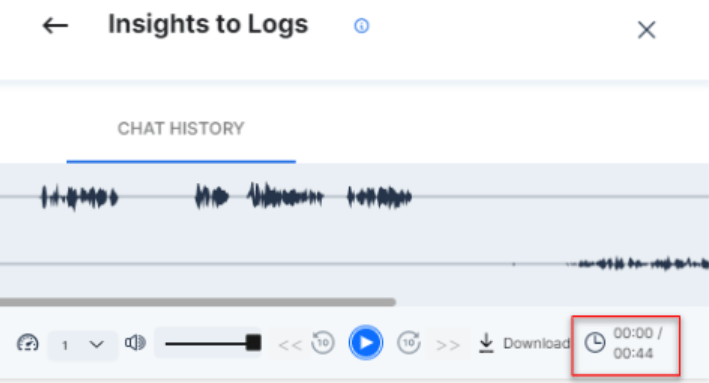
Duration: The increment and countdown counters appear during playback. Total duration appears before playback begins.
- Customer speech during hold periods isn’t recorded or displayed, regardless of who initiated the hold.
- If Pause/Resume Call Recording is enabled, paused durations aren’t recorded.
Screen Recording
Recording Storage: Recordings are stored in an AWS S3 bucket in WebM format at 10-15 fps, up to 720p resolution, with high compression, and approximately 2 MB per minute. Supervisors can download screen recordings, which become available approximately 10 minutes after call completion.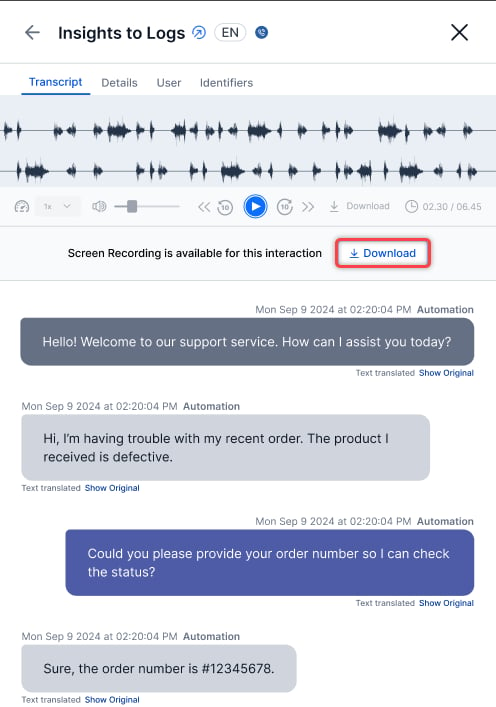
The system uses the voice call recording retention policy; supervisors can access all recordings, while agents can access only their own recordings.
Conversation Time Display Format
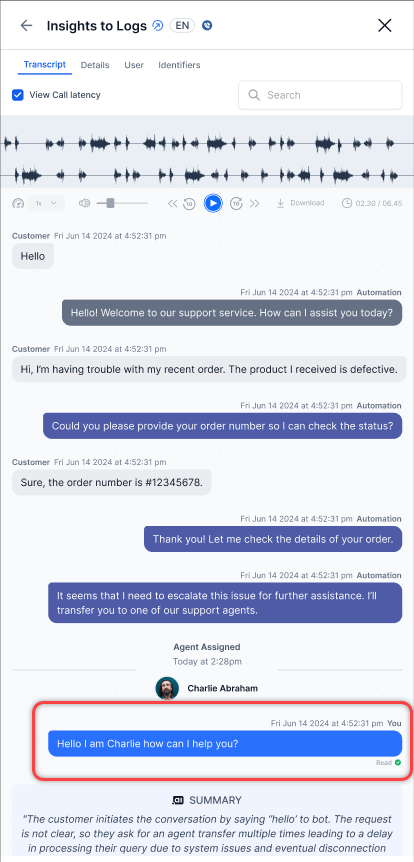
Administrators can configure Standard Timestamps or Duration Markers for call recordings. Learn more. The system displays recordings based on the selected option. Standard Timestamps: The system displays transcripts with exact date and time (for example, Fri Jun 14 2026, 4:52:31 PM) to support precise tracking.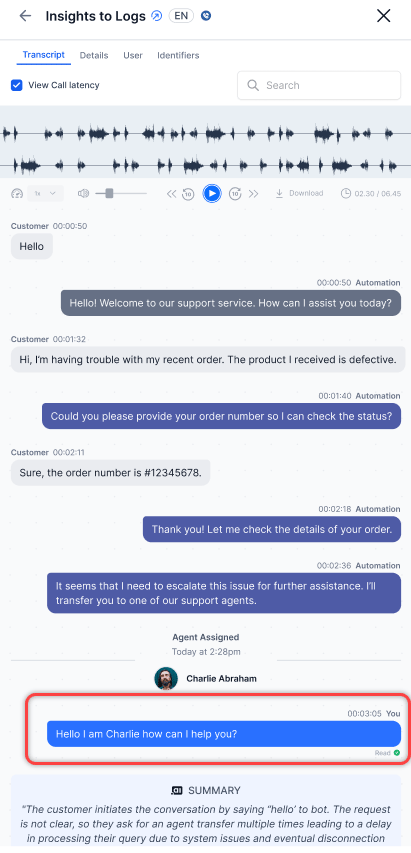
Troubleshooting
Why can’t I see my call recording? After every voice call, the system automatically tries to fetch the call recording from the recording server. The recording is usually available within 10 minutes. Delays or temporary issues may prevent it from appearing immediately. Status messages and what to do:
Behind the scenes: The platform automatically attempts to fetch the recording 10 minutes after the call ends. If the recording is unavailable, users can manually retry. The system also retries automatically after 24 hours. Background jobs continue periodic attempts regardless of manual retries.
Common reasons for delay or failure:
- Temporary network or connectivity issues between Kore’s system and the recording server.
- High server load delaying recording generation.
- The recording file hasn’t been finalized or is still being processed.
- A system error or missing call metadata prevents retrieval.
- Wait at least 10 minutes after the call ends before expecting the recording.
- Use Retry if the recording doesn’t appear.
- If the issue persists beyond 24 hours, contact your administrator or raise a support ticket with the Call ID, Timestamp, and Caller Number.
Diagnostics
Access Diagnostics from the top-right corner of Insights to Logs.This option is available only for voice conversations.
Flow
The Flow tab provides a detailed timeline of call signaling and media flow between endpoints. It displays the sequence of SIP messages and RTCP packets exchanged during a call, allowing agents and supervisors to track the complete communication flow and troubleshoot connection issues.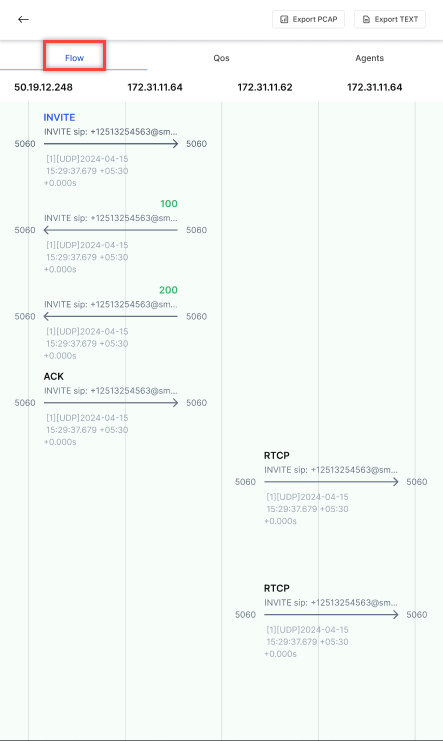
- INVITE - Direction: 50.19.12.248 to 172.31.11.64, Port: 5060 → 5060
- 100 (Trying) - Direction: 172.31.11.64 to 50.19.12.248, Port: 5060 ← 5060
- 200 (OK) - Direction: 172.31.11.64 to 50.19.12.248, Port: 5060 ← 5060
- ACK - Direction: 50.19.12.248 to 172.31.11.64, Port: 5060 → 5060
- RTCP (First packet) - Direction: 172.31.11.62 to 172.31.11.64, Port: 5060 → 5060
- RTCP (Second packet) - Direction: 172.31.11.62 to 172.31.11.64, Port: 5060 → 5060
- Track Call Setup: Follow the INVITE, 100 Trying, 200 OK, and ACK sequence to verify proper call establishment.
- Analyze Response Times: Use timestamps to identify delays in message processing.
- Monitor Media Flow: Review RTCP packets to confirm media is flowing properly.
- Identify Issues: Look for missing messages or unexpected responses indicating connection problems.
- Export Data: Use the export options to save the communication flow for further analysis.
QoS (Quality of Service)
The QoS tab provides detailed network metrics for call monitoring and troubleshooting.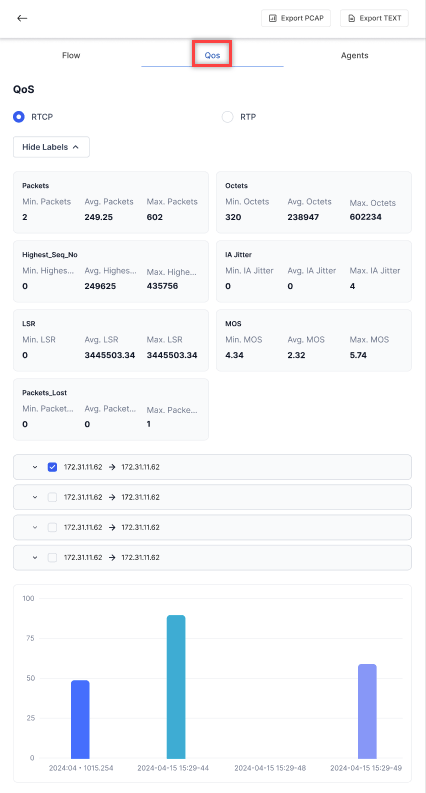
Octets
Highest_Seq_No
IA (Inter Arrival) Jitter
LSR (Last Sender Report)
MOS (Mean Opinion Score)
Packets_Lost
The interface displays IP connection information in expandable rows showing source and destination IP addresses. The bottom bar chart visualizes call metrics over time, with timestamps on the X-axis and metric values from 0 to 100 on the Y-axis.
Agent Participation and Call Diagnostics
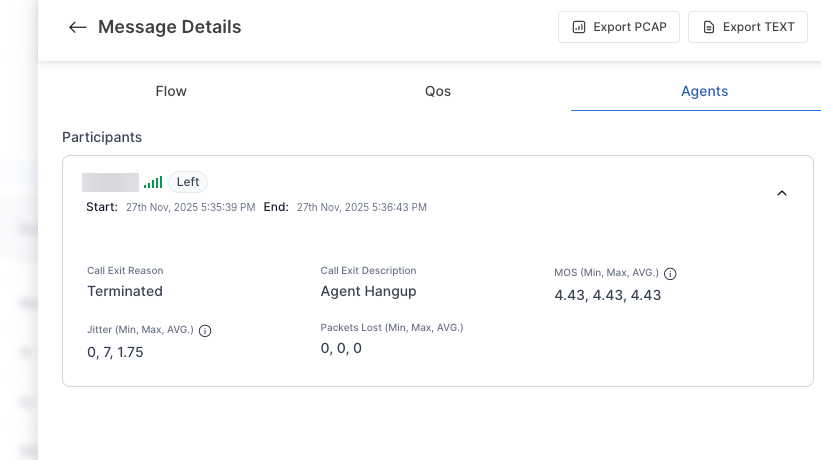
The Agents tab provides a per-agent view of participation and call quality metrics for a specific interaction. It helps to:- Identify which agents joined the interaction
- View join and exit timestamps
- Understand how the call ended
-
Analyze call quality per agent
- Accepts a call invitation (inbound or consult)
- Joins the interaction (including supervisor join)
- Routing attempts
- Ringing duration
- Rejected invitations
- Supervisor listen/whisper sessions
- Agent Name-The participating agent
- Status-Indicates whether the agent has left the interaction
- Start Time-When the agent accepted and joined the call
- End Time-When the agent exited the call
- Call Exit Reason-High-level termination status (for example, Terminated).
- Call Exit Description-Specific reason (for example, Agent Hangup, Customer Hangup).
- MOS (Min, Max, Avg)-Indicates perceived audio quality (1 = poor, 5 = excellent).
- Jitter (Min, Max, Avg)-Measures variation in packet timing (higher values may affect audio clarity).
- Packets Lost (Min, Max, Avg)-Indicates lost audio packets during the session.
- The view reflects actual joined sessions only, not routing attempts.
- If an agent appears multiple times, it indicates multiple join instances.
Network Interruption Re-routing
When a call is re-routed, the Agents tab lists the original agent and the new agent as separate rows with individual timestamps and call quality metrics.Export
You can export the following reports from the Diagnostics panel:- Export PCAP
- Export TEXT
